
Resin art: enrich your creativity with an easy way to make art
What is Resin Art?
Make your own Resin Art
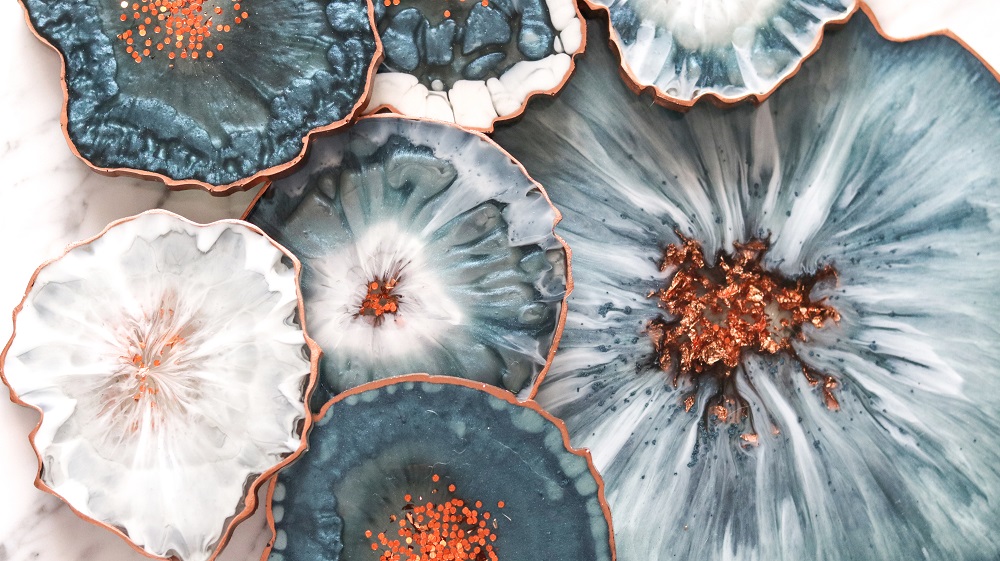
Resin Art is a new, modern art form. If you want to make Resin Art, you use epoxy resin. You can pour this resin into a mold, into a piece of wood or on a surface. By adding pigment, you can create beautiful effects and creations.
Some examples of Resin Art:
- Casting dried flowers
- Making coasters with marble effect
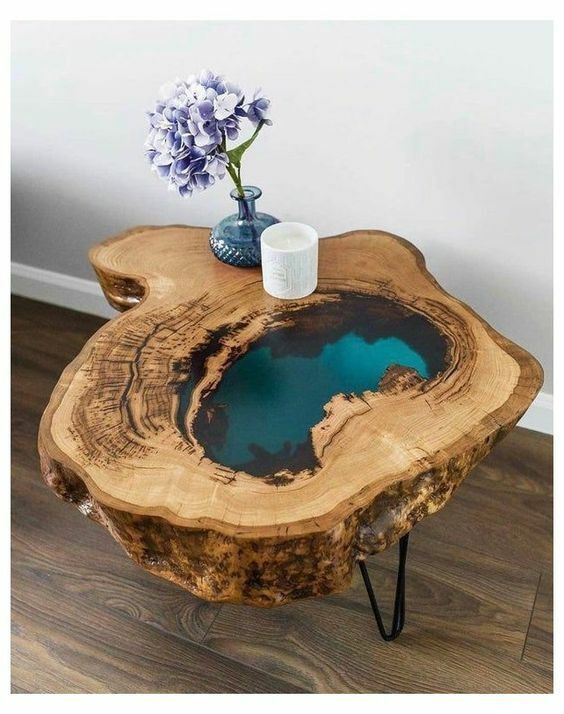
- Making river tables
- Jewelry making with crystal epoxy resin
Below we explain all about Resin Art and how to get started with it.
What is resin art and how do you get started with it?
Resin Art is a new art form brought over from the United States. Social media is full of it these days. Basically, we refer to it simply as epoxy art. It involves casting or pouring over an object with epoxy resin.
Epoxy is a two-component material. By mixing the two components, a chemical reaction takes place that gradually hardens the liquid resin into a hard, glass-like plastic. You can choose from crystal clear epoxy resin, which gives you a magnifying effect. Or you can add pigments or glitter to create textures like marble or even water.
How do you get started making resin art?
Basically, you need three things: your objects to be cast in, your epoxy resin and your mold to pour your resin into. How you proceed depends on the application for which you are using the epoxy resin.
Objects
As for your objects, you can use almost anything you want as long as it is dry. By this we mean that you can't pour in damp or wet things. Think of fruits and vegetables or a piece of meat. Your resin will not react as favorably to the moisture present and will become cloudy and opaque as a result. So if you want to pour in something, such as flowers, be sure to let them dry thoroughly first.
Epoxy resin
As for epoxy casting resin, there is an oversupply available on the market. The important thing here is to take an extremely crystal-clear epoxy that is also UV-resistant. Standard casting epoxy will discolor and lose its shine quite quickly. Furthermore, there are three types of epoxy casting resins. A fast-curing version for very small castings. A slow version for volumes up to 5 liters and then an ultra slow casting resin that you should use for large volumes over 50 liters such as river tables.
Molds
Which molds can you use? Again, there are several options available here. You can use plastic cups or containers or buy your rubber molds at the hobby store. Of course, you can also manufacture your own molds. You do this with the inexpensive latex mold rubber or with the fast, but more expensive silicone-based mold rubber. All these materials have the advantage, that you don't have to use a release agent or an anti-adhesive product. Your epoxy has no adhesion on plastic, latex and silicone rubber and is therefore self-releasing.
Make your Christmas ornaments with epoxy casting resin - Pouring your own Christmas decorations
After a wonderful summer vacations comes autumn and soon the Christmas season is upon us. An ideal time to show off your self-cast Christmas decorations. But then you'll have to get started. We would like to give you some great ideas for quickly casting your own Christmas decorations with colorless epoxy casting resin.
Cast your own earrings
Have you always wanted to make your own jewelry such as earrings? Then read on quickly and discover the many possibilities you can achieve with crystal casting epoxy.
Start by looking for items you would like to cast. Make sure they fit into your mold and that the objects are thoroughly dry. It doesn't really matter which material you use. This can really be anything. From dry flowers to pieces of textile or crystals. All this you can combine with the appropriate color pigments. You add the dye to your resin mixture and color your resin.
Now purchase your molds. There are several options here. You take a plastic container that is approximately the right shape or you make your own rubber molds . This rubber can be based on the inexpensive latex mold rubber or you choose the two-component silicone rubber. This exists in both a molding rubber and a moldable version. The second one is super fast and therefore useful for small molds. The advantage of these molds is that they are self-releasing. So you don't need to use a release agent or anti-adhesive product to get your epoxy casting out of your mold.
Now you are ready to get started with the epoxy. You will receive two cans, which you need to stir together in the correct mixing ratio. When mixing, be careful not to mix in too much air. The Epoxy Clear is crystal clear and allows you to add color pigment. If you add very little dye, the epoxy still remains semi-transparent. The more dye you add, the more opaque the epoxy becomes. The choice is entirely up to you.
If you want to float objects in the resin, proceed as follows.
Make an initial small amount of resin with the hardener. Pour this as a first layer into your mold. Leave this like this for an hour. You will see that the resin is no longer liquid and you can then place your object on it. If your first layer has stood long enough, your object will stay on this layer. Now make a 2nd small amount of resin and hardener and pour it over your object, until it is completely covered in resin. If you wish to color your final layer, again wait until your 2nd layer has gelled and make your 3rd mixture of resin and hardener and then pour this final layer over everything. After completely drying, you can unmold your casting from your mold and it will be usable almost immediately.

Casting a key chain with epoxy resin
Do you wish to cast your own trendy keychain? The best way to do this is with an epoxy resin. This thin liquid resin must first be mixed with the corresponding hardener. Once the two are mixed together, the curing process begins. Your liquid resin solidifies after an hour so to speak, and so you are able to place your object to be cast on it. Then you pour a new mixture over it to finish your keychain.
You do need a mold for casting in objects. One idea is to make a rubber mold from an existing keychain. You can do this very easily with the malleable silicone rubber. You mix the two products with your fingers and press them like a paste on your object to be copied. It does not matter, from which material your object or original is made. This may be plastic, leather or wood. The kneedsilicone will not stick to your original and will reproduce all of its details perfectly. So if you want a perfectly smooth and shiny key ring, take a shiny original and the kneedsilicone will take over this shine.
In this rubber mold you can pour your epoxy casting resin. Either with or without the desired color pigments. You add this color pigment to your mixture of resin and hardener.
Casting a side table with resin
Perhaps you have an old and not so nice side table somewhere in the attic that you would like to give a second life. Then you can easily do this yourself by pouring epoxy resin over it.
So you can first paint the table with a lacquer or paint and then seal it with a colorless casting epoxy. Or you can also choose a beautiful photograph, a piece of textile or a selection of dried autumn leaves. You can actually fix and pour in anything with the epoxy. This can be done in a few millimeters up to even a thickness of 4 or 5 cm. The choice is completely up to you.
Take note. Sometimes it is best to use a specific type of epoxy casting resin. There are variants that are only suitable for very thin layers and others that you should use if you want to cast thick layers. Therefore, seek proper advice before purchasing epoxy resin.
Recycling old furniture is very in these days. For example, you can buy an oak table at a second-hand market for a bargain. Attaching wide adhesive tape around the edge of the table creates a height that you can fill with all sorts of objects and items. Think of cork stoppers, champagne crowns, shells, photos, flowers, glass shards,... which you can then pour with crystal clear epoxy. To finish it off nicely, spray a colorless varnish over it with a spray can or brush a clear varnish over it for protection against UV rays and scratches.
Cast in your photos and eternalize them in a beautiful frame
The technique of pouring in photos has been around for years. People formerly used the much cheaper crystal clear polyester resin for this purpose. This is still possible, but you have to put up with the annoying smell. If you do this outside, you won't be able to tell the difference between polyester and a transparent cast epoxy resin. Nowadays, epoxy is used more often because these types of resins are virtually odorless and because the mixing ratio between the resin and hardener is easier. The new generation of epoxies have a convenient 2:1 or 1:1 ratio. Epoxy resin also cures non-stick to the surface. This does come in handy if you wish to cast pictures. The epoxy resin has a magnifying effect on your photo. You can also pour on canvases so they don't get dirty or fade.
More Info
Feel free to contact us to receive more info about our products.